There’s truly nothing worse than losing that extra bit of precious sleep time in order to do your makeup of a morning.
But lucky for us, the world wide web is chock-a-block with a heap of weird, wild and wonderful info – some of that being some very clever cookies who have come up with genius hacks to save time (and frustration) when it comes to makeup.
While you should take any advice you find on the net with a large grain of salt, the following makeup hacks have been tried and tested by yours truly, so I can personally attest to the effectiveness of these methods just so you don’t have to.
You’re welcome.
For more on this topic, follow the Fashion and Beauty Observer.
Cleaning your beauty blender
https://twitter.com/TheLifeOfCoko/status/978707430098993152?ref_src=twsrc%5Etfw%7Ctwcamp%5Etweetembed%7Ctwterm%5E978707430098993152%7Ctwgr%5E%7Ctwcon%5Es1_&ref_url=https%3A%2F%2Fwww.goodhousekeeping.com%2Fbeauty-products%2Fa25629388%2Fhow-to-clean-beauty-blender%2F
It’s super important to clean your brushes and beauty blenders on the reg, since dirty tools can harbour potentially harmful bacteria, such as Staphylococcus aureus and Escherichia coli.
“The longer something stays wet, the more likely it is for mould to grow,” says Good Housekeeping Institute Cleaning Lab Director, Carolyn Forte. “Plus, the fact that these sponges touch your face and likely have bacteria on them makes it all the more important to keep them clean and dry.”
While the traditional method can be time-consuming, we’ve discovered a hack to clean your beauty blender far more quickly.
Basically, you squirt a small amount of dishwashing liquid onto your beauty blender. Then, immerse your sponge in a cup of water and then microwave for 40 seconds to one minute.
Let the blender cool before removing it from the water (it will be hot!) and wait until the water has cooled to squeeze your blender and voila!
Flawless wings

Have you ever tried to achieve that Taylor Swift-style cat eye but ended up looking more like a panda bear on a bender? DW, we’ve all been there.
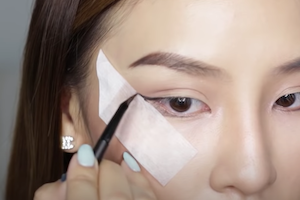
But this next hack will truly change your makeup game and give you a perfectly straight liquid eyeliner cat eye without having to reach for the makeup remover and Q-tips.
All you need to do is get a bit of sticky tape (or any other type of tape) and place it along the side of your eye where you want to place your liquid liner. Then, simply draw along the line and peel off. Simple, yet totally effective.
Check out this helpful tutorial for a step-by-step guide on how to nail this hack.
Using a tampon to remove nail polish
https://www.tiktok.com/@ag380gtmgmt/video/6954166953875377413?referer_url=https%3A%2F%2Fwww.allure.com%2F&referer_video_id=6954166953875377413&refer=embed
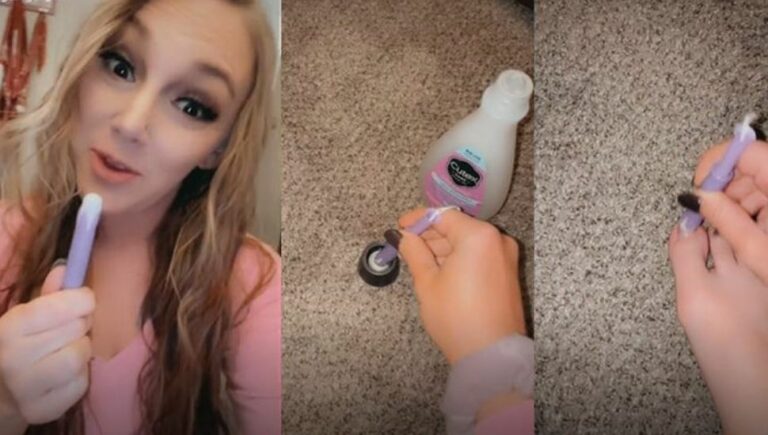
TikTok user @ag380gtmgmt posted a genius hack that demonstrated how to remove nail polish using a tampon, meaning you can remove your pedicure without potentially ruining your mani.
“I’m about to show y’all a life hack — with one of these,” she says, holding up a tampon with a plastic applicator.
“Pour some nail polish remover in the lid here and soak it up,” she says as she dips the cotton tip of the tampon into the liquid-filled bottle cap. “You can take your nail polish off without messing up your fingernails.”
Thicc lashes
https://www.tiktok.com/@j9homiemakeup/video/6892721337274535169?refer=embed
If you want luscious, thick lashes without the fuss, then this super simple tip is for you. All you need to do is coat your lashes with mascara as usual, then sprinkle a tiny amount of translucent powder over your lashes before coating them with mascara again. Too easy!
Longer-lasting mascara
Do you have a dried-out mascara or eyeliner but don’t have the funds to fork out for a new one in a pinch?
Well, all you have to do is add 2 or 3 drops of eye drops into the product and shake it up or stir the mascara wand before trying it out again to give it a second wind.
If it still feels a little dry, then just add a few more drops until it’s of desired consistency.
Easily applied lipstick

If you love wearing a statement lippy but hate the arduous process of applying it perfectly to your lipline, then this is for you.
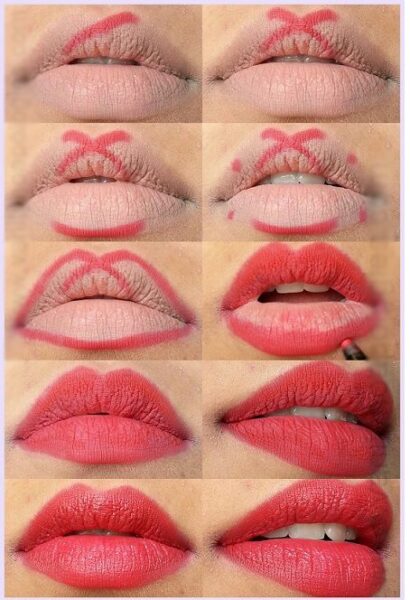
Basically, you begin with a lip liner, but instead of going for the usual outline of your lip shape, begin by drawing an X at your Cupid’s bow.
Then, draw a one-centimetre line in the centre of the bottom lip before filling in the rest. Doing it in stages will ensure you get that Kylie Jenner-esque immaculate lip line in half the time.


