We guide you through the simple process of expanding the SSD storage of your PS5 so you can start downloading even more games.
If you’ve been using your PS5 for a little while, you’ll likely notice that storage space on the hard drive tends to fill up pretty damn quickly. That’s especially the case for Call of Duty fans – the series known for taking upwards of 65 GB. The solution? Pick up a compatible SSD and you can double or even triple the amount of storage space for your new PS5.
But while cracking open your PS5 might sound a little scary, it’s honestly not too bad at all.
Here’s how you go about it:
1 – Buy a compatible SSD.
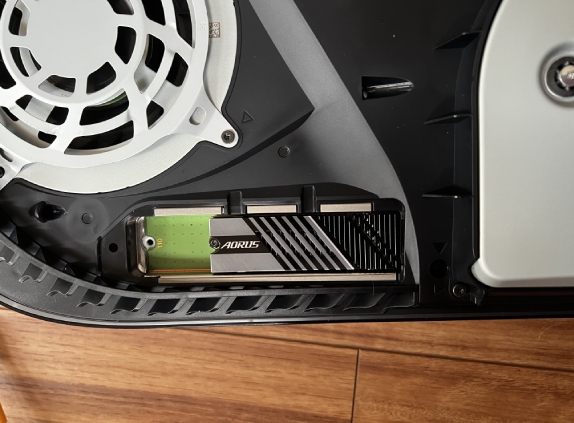
A quick google will be able to show you what SSDs are compatible with the PS5, but we used the 1TB AORUS Gen4 7000s M.2 SSD during our walkthrough and can highly recommend it for your needs as well.
The tiny unit can handle a Sequential Read Speed of up to 7000 MB/s and Sequential Write speed of up to 5500 MB/s. Meanwhile the 7mm height heatsink makes it perfect for use with the PS5 and a solid 5-year warranty doesn’t hurt either.
You can pick one up the 1TB AORUS Gen4 7000s M.2 SSD from Mwave for about $279.00.
Love Film & TV?
Get your daily dose of everything happening in music, film and TV in Australia and abroad.
Alternatively, AORUS also have the NVMe Gen4 SSD 1TB which has slightly slower speeds, but should be a little friendlier on the wallet.
2 – Disconnect your PS5 and take off the cover
It’s essential that you properly shut down your system before you get started and completely disconnect it from any power. Once you’re free of cords it’s best to set your system down somewhere safe and turn it over so that the PlayStation logo is facing the floor and the power button away from you.
From there you want to take your right hand to grip the bottom right of the cover and pull up. At the same time use your left hand to slide the other side of the cover towards the left.
We’ll admit, this can feel a little dicey, so take your time and don’t rush it. You’ll need a decent amount of force to get the cover off, but start slow and work your way up so you don’t break anything.

3 – Remove the expansion slot cover
Once the PS5 cover is off, give yourself a pat on the back and wipe away any potential beads of sweat. You’re only just getting started.
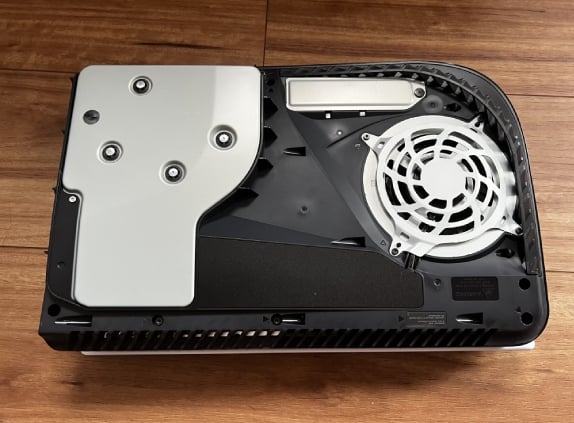
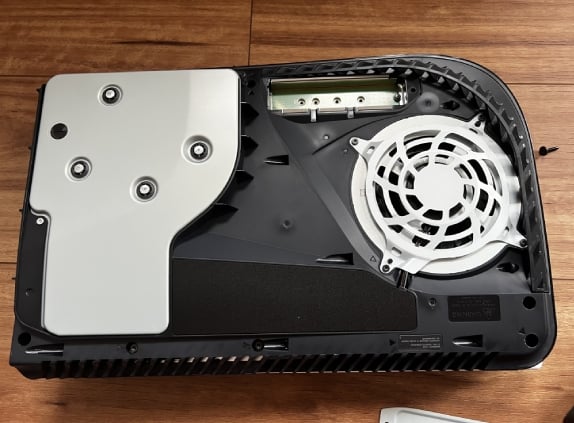
Now you’ll need to grab yourself a Phillips head screwdriver and take out the screw holding the silver plate that should be visible near the console’s fan. Put the cover and screw aside and you’ll now see the storage slot where your new 1TB AORUS Gen4 7000s M.2 SSD will go.

4 – Unscrew the M.2 SSD storage drive screw
This is the not so fun part, but next up you need to take out the black screw and the spacer inside the storage slot.
Our advice: take your time on this one. We absolutely struggled with this bit when we upgraded, and if you don’t find the right size screwdriver you’ll likely strip the screw and be up shit creek. If that does happen – we suggest placing a rubber band over the hole, then pressing down on top of it with your screwdriver for extra traction.
Sounds strange but worked a treat for us and might help get you out of trouble.
5 – Install the M.2 SSD drive
Once the screws are out, you should be able to slot your 1TB AORUS Gen4 7000s M.2 SSD into place, then use the screw you just took out to fasten everything together.

6 – Put everything back together
Now that the SSD is in place you’ll want to reattach the metal expansion slot cover and slide the PS5 cover back into place. If you look at the little hooks on the cover that should make the process a little easier. Just listen out for a loud clipping noise.
7 – Reconnect the PS5 and format the SSD drive
You’re on the home stretch now! Once you hook your PS5 back up to power, once you turn it on you should be greeted with a message asking if you want to format your new storage drive.
Basically that just means your console is setting things up so you can get going right away.
8 – Get gaming
Yep, that’s all there is to it. Your PS5 can download even more games meaning you won’t need to worry about clearing up space for some time yet.
Bravo, gamers!
To stay up to date on this, follow the Gaming Observer.


